A Prescription for the Successful Use of Heavy Filled Composites in the Posterior Dentition
• Donald F. Davidson, DMD •
• Makoto Suzuki, DDS, M.Sc., DMD •
© J Can Dent Assoc 1999; 65:256-60
[Cavity Preparation| Choosing a Matrix |Material Placement |Curing Lights| Finishing| Clinical Observations| References]
Restorative dentistry is making a definite paradigm shift. Our patients today have expectations that reflect a much better understanding of dental procedures than we might have seen two or three decades ago. Patient expectations have moved from maintenance of function solely to maintenance of function with an insistence on esthetics as well. Today, a practitioner must be able to work on a damaged tooth and return it as close as possible to its immediate post-emergent state.
To assist us, manufacturers of composite resins have made appreciable advancements in their products. Currently available materials are significantly more wear resistant and esthetically pleasing, with much improved optical properties to enable colour matching and the maintenance of that colour over time. These materials are also significantly more manipulable, thus allowing a more satisfactory final result both visually and functionally.
Until relatively recently, we were ill advised to place posterior composites on occlusal surfaces for fear of having them wear away rapidly. One of the innovations accomplished by some manufacturers has been the improved distribution of filler particle sizes, such that inter-particle distance has been reduced and material packing efficiency increased. As well, there has been an increase in the effectiveness of the silanization of those filler particles, such that wear resistance of the finished restoration has been greatly improved.1-4
The time has come, then, not to discard the cast gold and silver amalgams that have long been used for posterior restorations, but rather to broaden the possibilities by including modern composites.
Is composite resin better than the more traditional metallic restorations? There are a number of important issues to ponder:
- Canada’s changing demography and a patient population dominated by the post-fluoride generation has resulted in lower caries incidence.5
- To place metallic restorations, specific cavity preparation must largely be adhered to and commonly results in the removal of sound tooth structure.
- Bondable restorations require a much more conservative tooth preparation and establish an almost-total hermetic seal of the cavity, if done properly.
- Tooth-coloured materials are esthetically preferred by patients over metallic restorations.
The challenge for the profession at large and for academia has been the need for wholesale change in the approach to cavity preparation. Today’s practitioner requires a much more conservative approach that emphasizes the micro-mechanical principle of material bonding.
Although parameters similar to those used for amalgam preparations were emphasized in the past, a more conservative tooth reduction in both extension and depth is commonly recommended today.6,7 Proper isolation of the operating field by means of rubber dam placement is mandatory when bonding material and composite resin are used. Because our composite materials bond better to enamel than to dentin, there is no need to prepare into dentin where decay has not penetrated or extended.
Decay is removed and extended to ensure complete decay removal; the practitioner’s only concern should be access to the prepared cavity to effect placement of the restorative materials.
In principle, proximal box preparation should result in the cavosurfaces being at right angles to the enamel surface vestibularly and lingually. Gingival floors should clear the contact apically and be butt joined.8
In Class II situations, pre-wedging ultimately results in a tighter composite contact to the approximating tooth. Aggressive wedging immediately after rubber dam placement will result in slow separation while cavity preparation is done. Wooden wedges (Premier Dental, Norristown, PA) also protect the rubber dam septa during the cavity preparation and prevent salivary seepage. With the cavity prepared, the wedge or wedges are removed, an appropriate matrix is placed and the wedges are aggressively replaced.
Choosing a Matrix
One of the major shortcomings associated with the use of composite in Class II situations is the difficulty of establishing a convex, positive proximal contour (Fig. 1). To achieve this contour, the matrix of choice is ultra-thin, contoured and metallic, which eliminates any of the plastic bands available today (the thinnest of which is 0.0050 inch [127 µm]). If physically possible, the matrix should be precontoured to create a natural tooth convexity in the finished restoration. Even the very viscous packable composites have difficulty distending the matrix toward the approximating tooth surface and maintaining that dimension.
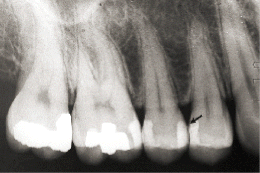 |
| Fig. 1: Post-operative radiograph showing ideal proximal contour of the composite restoration (arrow). |
A very good matrix is the precontoured sectional matrix, which has a thickness of 0.0015 inch (38 µm) (ComposiTight, Garrison Dental, Spring Lake, MI; Contact Matrix, Danville Eng. San Ramon, CA). This type of matrix can be very difficult to place if the proximal box is very conservative such that sufficient clearance is not available from the adjacent tooth. The sectional metal band kit comes with retainer rings that can be used to secure the open ends of the sectional band against the tooth interproximally. We have found that condensation pressure of these filling materials is insufficient to force significant amounts of material out beyond the vestibular and lingual of these bands and, with care, flash tends to be minimal. In cases where the proximal box is kept conservative, dead soft 0.001 inch (25 µm) (Ho Band, Lorvic, St. Louis, MO) uncontoured circumferential bands can be used with success, well burnished and aggressively wedged. Precontoured circumferential metal bands are unsatisfactory because of their relative thickness (0.0025 inch [64 µm]).
Material Placement
Total etch for 15 seconds with 37% phosphoric acid is necessary to effect a proper hybrid layer and a highly if not totally effective seal against fluid movement after bonding agent placement.
In the posterior composite placement done in our clinical trials, total etch has never been implicated in any post-operative sensitivity, probably because of the careful control of the moisture level post-etch and wash, such that "moist" bonding could be effected.9
A generous coat of bonding agent is applied and maintained wet for a minimum of 30 seconds on a moist internal cavity surface. The preparation is then gently air dried to encourage the hydrophilic carrier to evaporate, leaving the resin component within the cavity walls. The bonding agent is light cured, placed again, immediately carrier evaporated and light cured again. Sufficient curing is accomplished with a 10-second cycle.
If internal cavity surfaces are deemed deep relative to the pulp — i.e., less than 1 mm from the pulp — a glass ionomer base is recommended before acid etching for the following reasons:
- Resin bond strength to partially demineralized dentin or deep dentin is greatly compromised, allowing a gap to develop at the interface after the placement of composite resin.10
- Glass ionomers undergo minimum polymerization shrinkage during the setting reaction, which tends to preserve the bonded interface.
- The presence of the chalky-textured glass ionomer can be more easily seen should the cavity need to be re-entered in the future; a composite bonds directly to the internal prepared cavity surfaces.
- Fluoride release is beneficial for the remineralization of the surrounding dentin.11
- In our clinical experiences, post-operative sensitivity is completely negated with the use of glass ionomer cement as a liner. The reason is not totally clear; however, the chemical bonding of glass ionomer to tooth structure and the minimum curing shrinkage may translate into a more complete hermetic seal in the final restoration.
After the clinician confirms the proper set of the glass ionomer liner, the cavity is etched, washed and gently air dried. The bonding agent is placed with a brush to avoid excess pooling. If thinning is necessary, it should be done with the brush, as air thinning tends to compromise hybrid layer integrity.12,13 When this integrity is compromised, microleakage often results, with subsequent sensitivity, marginal stain and decay. As well, a thick adhesive surface can appear as a radiolucency in subsequent radiographic surveys due to the limited or no radiopacity.
Without exception, all bis-GMA- and UDA- (urethane diacrylate) based composite resins undergo contraction upon polymerization, leaving the stresses to build within the cured composites. To minimize these contraction stresses, modified light curing methods (e.g., pulse curing, soft curing, etc.) have been postulated;14,15 however, the clinical significance of these methods has not been determined. The greater the bulk of material, the greater the shrinkage and, hence, the greater the stress placed on bonded interfaces.16 Another serious consideration should be the gingival margin in a Class II situation. If decay is to re-occur, it is likely to do so at this juncture; to that end, a very thin (1 mm) layer of composite should be teased into the depth of the proximal box and light cured for a 20-second cycle. The proximal box up to the level of the pulpal floor can now be filled and cured for 20 seconds without danger of the material being pulled away from the critical gingival margin.
The remainder of the fill can be completed in one or two increments depending on the size of preparation. Overhead chair lights will stiffen these materials sufficiently to render them insensitive to sculpting in a short time; therefore, the light should be dimmed or turned away from the operating field during the contouring to allow a longer working time.
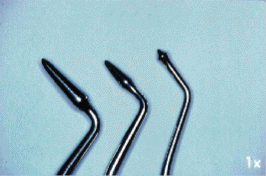
Contouring or sculpting is best accomplished using hand instruments with rounded tips, such as the PKT-3R, or cone-shaped tips, such as the BB21 (Hu-Friedy, Chicago, IL) (Fig. 2). These instruments can be used to tease the material into proper anatomical form and to remove any obvious excesses before curing.
After removal of the matrix, an additional 20-second cure lingually and another from the vestibular angle ensures a thorough cure. Incomplete polymerization at the time of placement adversely affects several material properties such as wear (occlusally and interproximally), colour stability and marginal integrity with subsequent staining and recurrent decay.
Although post-operative sensitivity has been reported by others and attributed to cuspal stress17 due to curing contraction, we could not attribute any of the transient and minor sensitivity in our patients to this phenomenon.
Curing LightsResearch has shown that the intensity of light emitted by curing lights often leaves something to be desired. The light output of chairside curing lights should be routinely checked. Optimum curing of visible-light-cured materials requires approximately 400 mW/cm2. Many curing lights in dental offices, because of design or unit condition, do not emit this level of light and should not be used. A handy curing radiometer is available to dentists and should be used at least weekly to guard against under cure and certain failure.18 Remember, the most common cause of composite failure is undercuring.
Greater access for interproximal cavosurface finishing can be obtained by replacement of the wedge. One of the best rotating instruments to remove excess and refine occlusal anatomy is the posterior composite sculpturing diamond (Brasseler, Savannah, GA). When carefully used, this instrument effectively and expeditiously removes excess composite into desired occlusal anatomy. Judicious smoothing of the interproximal area below the contact is accomplished with narrow finishing strips and fine posterior composite finishing diamonds (E.T. Diamonds, Brasseler, Savannah, GA). Extreme care should be used to avoid removal of the interproximal contact. Abrasive finishing tips (Enhance Discs, Dentsply-Caulk, Milford, DE) can be used occlusally to smooth, refine and define anatomy. These tips, which come in a variety of shapes, remove material with heavier pressure and polish as pressure is reduced. They should be used intermittently to avoid overheating. Finishing composites precisely at the cavosurface margin requires experience and great care. Rapid, rough reduction will result in so-called "white margin." The use of a magnifying lens is highly recommended, as even the skilled operator can overlook excess material beyond the cavosurface margin.
After removal of the rubber dam, occlusion is checked and selectively reduced and repolished.
There are several acceptable and comparable composite materials available for restoration of posterior teeth. Using two popular heavy filled composites from two different manufacturers (Z100, 3M Dental Products, St. Paul, MN; TPH, L.D. Caulk, Milford, DE — referred to as product Z and product T, respectively), a total of approximately 140 relatively large composites were carefully placed in molars with functional occlusion and followed over a four-year period. Of these procedures, 65% were Class II restorations involving more than two surfaces of the anatomical crown and several involved cusp replacement.
Recalls were conducted at six months, one year, two years and four years according to the American Dental Association (ADA) acceptance program guidelines. Parameters used and evaluated were those of the Ryge Method for Clinical Criteria recommended by the Council of Dental Materials of the ADA.19
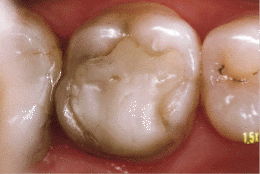
Excellent colour stability, maintenance of anatomical form and interproximal contact were routinely observed.
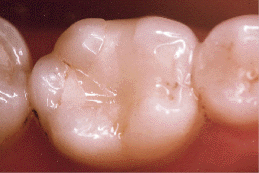
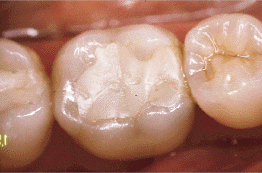
Marginal integrity was excellent (Figs. 3a and 3b), with one-third of the sample restorations exhibiting slight marginal catches (Figs. 4a and 4b) and only 5% of the restorations requiring replacement after four years. Need for replacement was due to excessive marginal discrepancy (3), bulk fracture (2) and recurrent decay (2).
 |
 |
| Fig. 3a: Restorations placed on lower first molar with product T after 4 years. No evidence of crevice at the cavosurface or marginal staining (Alpha). | Fig. 3b: Restorations placed on lower first molar with product Z after 4 years. No evidence of crevice at the cavosurface or marginal staining (Alpha). |
 |
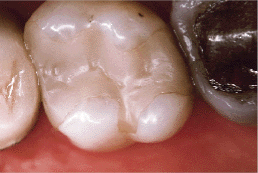 |
| Fig. 4a: Restorations placed on upper first molar with product T after 4 years. Slight catch at the cavosurface margin (Bravo). | Fig. 4b: Restorations placed on upper first molar with product Z after 4 years. Slight catch at the cavosurface margin (Bravo). |
Secondary caries occurred on two side-by-side teeth interproximally — a reflection of the patient’s poor oral hygiene.
Average occlusal wear from baseline was 43 µm with product T and 39 µm with product Z, with a range of 10 µm to 70 µm (ADA-restricted acceptance required a posterior composite to have an average four-year wear of no more than 175 µm measured from six months).
Over the longitudinal study of four years, the two materials proved to be excellent. They were durable and maintained extremely stable properties even in the face of very heavy functional stresses.20,21 It is our conclusion that, if carefully placed, these materials have a long-term expectation of excellence and wear, with function being well within ADA-accepted limits for restorative materials used in functional applications. a
Dr. Davidson is assistant professor, department of restorative dentistry, faculty of dentistry, University of Manitoba.
Dr. Suzuki is professor and head, department of restorative dentistry, faculty of dentistry, University of Manitoba.
Reprint requests to: Dr. Makoto Suzuki, University of Manitoba, Faculty of Dentistry, Department of Restorative Dentistry, D227 - 780 Bannatyne Ave., Winnipeg, MB R3E 0W2.
The authors wish to acknowledge the grants received from the L.D. Caulk/Dentsply Company and the 3M Company to conduct the four-year clinical trials.
1. Lambrechts P, Braem M, Vanherle G. Buonocore memorial lecture. Evaluation of clinical performance for posterior composite resins and dentin adhesives. Oper Dent 1987; 12:53-78.
2. Lambrechts P, Vanherle G, Vuylsteke M, Davidson CL. Quantitative evaluation of the wear resistance of posterior dental restorations: a new three-dimensional measuring technique. J Dent 1984; 12:252-67.
3. Lambrechts P, Braem M, Vuylsteke-Wauters M, Vanherle G. Quantitative in vivo wear of human enamel. J Dent Res 1989; 68:1752-4.
4. Suzuki S, Tso RC, Suzuki SH, Leinfelder KF. Enamel wear against various posterior composite resins. J Dent Res 1995; 74(Abstr. 632):90.
5. Banting DW. Dental education in Canada — what lies ahead? J Can Dent Assoc 1998; 64:443-8.
6. Summitt JB, Della BA, Burgess JO. The strength of class II composite restorations as affected by the preparation design. Quintessence Int 1994; 25:251-7.
7. Simonsen RJ. Conservation of tooth structure in restorative dentistry. Quintessence Int 1985; 16:15-24.
8. Jordan RE and Suzuki M. Posterior composite restorations: where and how they work best. JADA 1991; 122:30-7.
9. Gwinnett AJ. Moist versus dry dentin: its effect on shear bond strength. Am J Dent 1992; 5:127-9.
10. Gwinnett AJ, Kanca JA 3d. Micromorphology of the bonded dentin interface and its relationship to bond strength. Am J Dent 1992; 5:73.
11. Tyas MJ. Cariostatic effect of glass ionomer cement: a five-year clinical study. Aust Dent J 1991; 36:236-9.
12. Causton BE, Sefton J. Some bonding characteristics of a HEMA/maleic acid adhesion promoter. Br Dent J 1989; 167:308-11.
13. Fundingsland SM, Aasen SM, Ario PD, Viavattine JJ. Film thickness of unfilled resins and the effect of thinning technique. J Dent Res 1993; 72(Abstr. 1439):283.
14. Kanca J, Suh BI, Vinson W. Pulse activation of resin composite reducing stresses at cavosurface interfaces. J Dent Res 1998; 77(Abstr. 678):190.
15. Suh BI, Cripe CA, Cincionne F, Kanca J, Vinson WA. Shrinkage stress relaxation using pulsed curing. J Dent Res 1998; 77(Abstr. 1394):280.
16. Davidson CL, de Gee AJ, Feilzer A. The competition between the composite-dentin bond strength and the polymerization contraction stress. J Dent Res 1984; 63:1396-9.
17. Pashley DH. Dentin bonding: overview of the substrate with respect to adhesive material. J Esthetic Dent 1991; 3:46-50.
18. Fowler CS, Swartz ML, Moore BK. Efficacy testing of visible-light-curing units. Oper Dent 1994; 19:47-52.
19. Cvar JF, Ryge G. Criteria for the clinical evaluation of dental restorative materials. U.S. Dept. of Health, Education and Welfare. San Francisco, Calif. 1971.
20. Suzuki M, Davidson D. A 4-year clinical evaluation of zirconium silica contained composite resin placed on the posterior dentition. J Dent Res 1998; 77(Abstr. 668):189.
21. Davidson D, Suzuki M. A long-term clinical evaluation of a heavy filled hybrid composite resin as a posterior restoration. J Dent Res 1998; 77(Abstr. 669):189.